一、背景:页面为何会卡?
1.1 等待时间长(性能)
- 项目本身包/第三方脚本比较大。
- JavaScript 执行阻塞页面加载。
- 图片体积大且多。
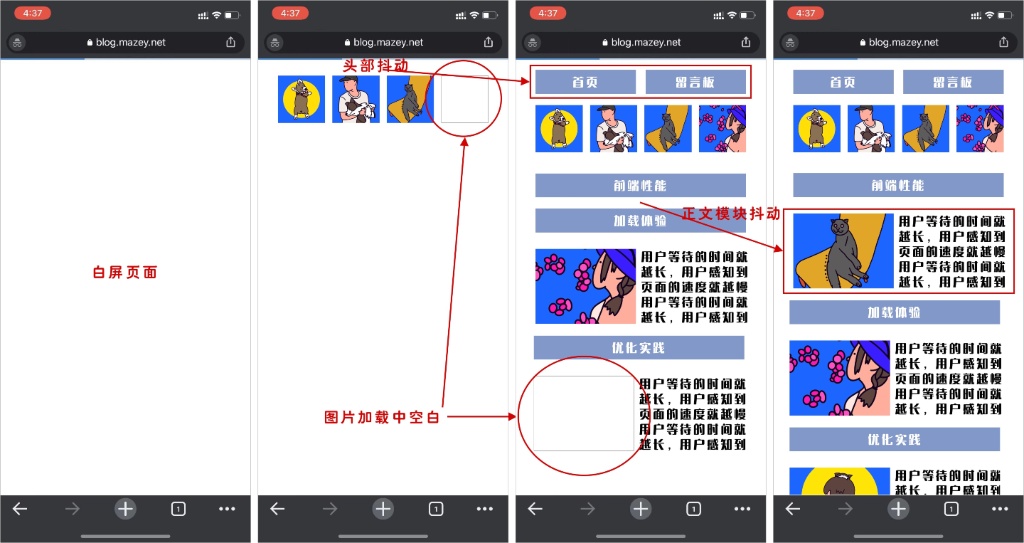
特别是对于首屏资源加载中的白屏时间,用户等待的时间就越长,用户感知到页面的速度就越慢。麻省理工学院的 Richard Larson 在讲话中指出,"人类将被动等待高估了 36%"(https://mazey.cn/t/em)。这意味着用户感觉到的等待时间比开发工具记录的长得多。
1.2 看起来卡(体验)
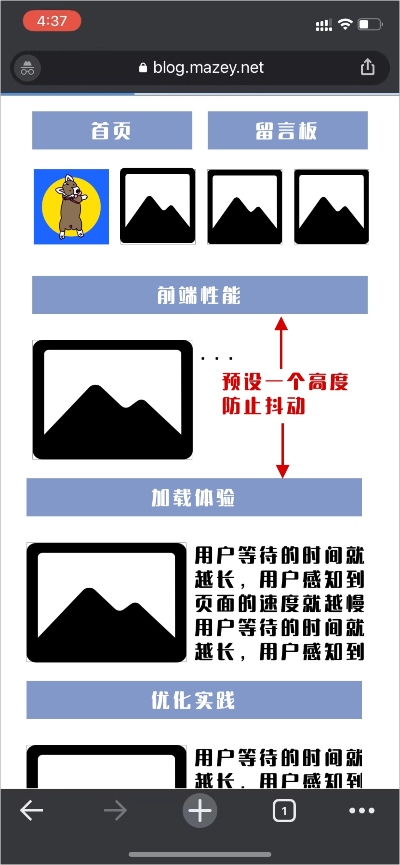
页面结构不断调整,不连贯。抖动的页面往往让用户感觉很卡。
二、优化性能
2.1 构建缩包,按需加载
2.1.1 npm
首先通过 Webpack 插件 webpack-bundle-analyzer 分析出项目中用到的 npm 包及大小。
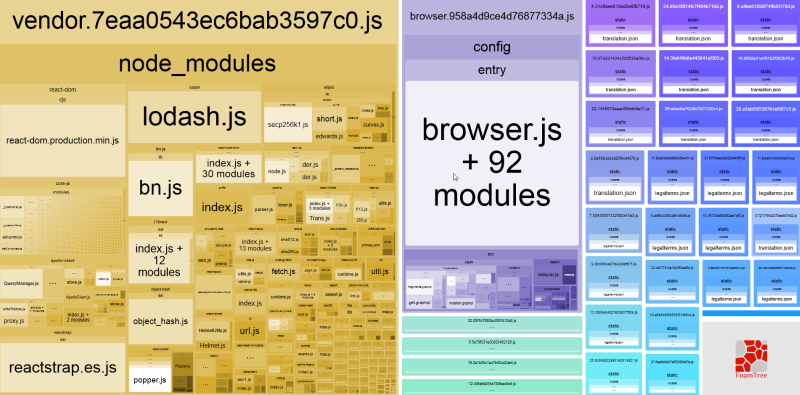
结合项目可以分析出哪些包可以去除,哪些包可以有更好的替代品。
| 名称 | 体积大小(Parsed) | 说明 |
|---|---|---|
| mint-ui | 96.05KB | 目前引入全部组件,需要按需加载 |
| moment | 95.51KB | 时间戳格式化的库,因为无法按需加载,目标是替换为可按需加载的 date-fns |
| quill | 213.31KB | 富文本编辑器 |
| whatwg-fetch | 9.25KB | 原生 fetch 的垫片,已存在 axios,需要统一 |
| ua-device | 148.48KB | 使用 Navigator 代替 |
| assets | 546.11KB | 整个项目的小体积图片,大部分需要替换成链接引入或者分模块按需加载 |
然后在项目中移除或替换无用包,以及部分包的按需加载。
mint-ui 按需加载示例:
import { Swipe, SwipeItem, Progress, Navbar, TabItem, TabContainer, TabContainerItem, Lazyload } from 'mint-ui';

Vue.use(Lazyload);
Vue.component(Swipe.name, Swipe);
Vue.component(SwipeItem.name, SwipeItem);
Vue.component(Progress.name, Progress);
Vue.component(Navbar.name, Navbar);
Vue.component(TabItem.name, TabItem);
Vue.component(TabContainer.name, TabContainer);
Vue.component(TabContainerItem.name, TabContainerItem);
2.1.2 外链
不影响页面主逻辑的外链往往不是很稳定,一定要等首屏加载完成以后按需加载。
示例:
// 加载其它资源
if (canLoad()) {
    let s = document.createElement("script");
    s.onload = () => {
        // ...
    };
    s.setAttribute(
        "src",
        "https://example.mazey.net/sdk.js"
    );
    document.body.appendChild(s);
}
2.2 减少图片体积
2.2.1 调整尺寸
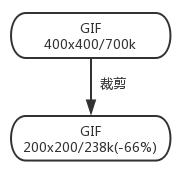
一般来说尺寸越大,图片质量越高,则体积越大;相应的减少图片的尺寸体积会变小,但质量也会变差一些,这里就需要按照产品需求在性能和体验上寻求一个平衡。
以一个尺寸 400x400 的 GIF 图为例,尺寸转为 200x200 之后,体积由 700k 减少到 238k(-66%)。
2.2.2 GIF 转 WebM
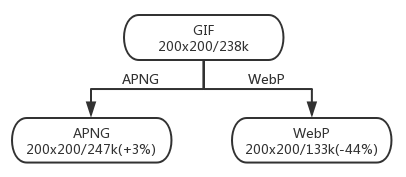
GIF 作为一个存在了长达 20 年的格式,兼容性当然是最好的,但是其体积和质量对比现在流行的其他格式已经没啥优势了。目前动图常见的表现格式是 APNG、WebP。
- APNG(Animated Portable Network Graphics)
基于 PNG(Portable Network Graphics)格式扩展的一种动画格式,增加了对动画图像的支持,同时加入了 24 位图像和 8 位 Alpha 透明度的支持,这意味着动画将拥有更好的质量,其诞生的目的是为了替代老旧的 GIF 格式,但它目前并没有获得 PNG 组织官方的认可。APNG 被 Mozilla 社区所推崇,2008 年首次在 Mozilla Firefox 中获得支持,2017 年 Google Chrome 开始支持 APNG,截止到现在主流浏览器中只有微软家的 IE 和 Edge 不支持 APMG。 - WebP
最初在2010年由 Google 发布,目标是减少文件大小,但达到和JPEG格式相同的图片质量,希望能够减少图片档在网络上的发送时间。WebP 有静态与动态两种模式。动态WebP(Animated WebP)支持有损与无损压缩、ICC 色彩配置、XMP 诠释数据、Alpha 透明通道。现在主流浏览器中只有 Google Chrome 和 Opera 支持 WebP。
以一个 GIF图 为例,格式转为 WebP 之后,体积由 238k 减少到 133k(-44%)。
但是 133k 的体积依旧很大,让人难以接受。作为动画效果,只要让视频循环播放,就能达到和 GIF 一样的效果,然后我又试了主流的 MP4、WebM。
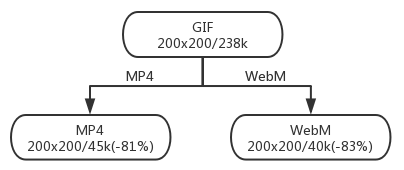
在转成 WebM(同样是 Google 家的视频格式)之后,体积由 238k 减少到 40k(-83%)。在使用过程中加上循环播放,去除控件和加载完成后再渲染就达到了和 GIF 一样的视觉效果。
示例:
<video autoplay muted name="media" loop poster="https://test.mazey.net/poster.jpg"
>
    <source src="https://test.mazey.net/source.webm" type="video/webm"
    >
</video>
2.2.3 PNG/JPG 压缩
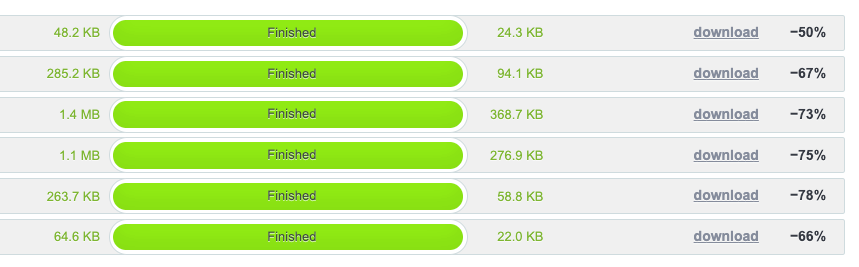
图片上传前先通过工具压缩下(例如:https://tinypng.com/),正常都会有 50~80% 的减少。
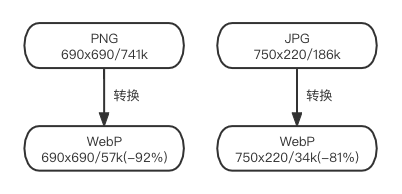
2.2.4 PNG/JPG 转 WebP
PNG/JPG 转 WebP 后图片体积减少了 4-7 倍。
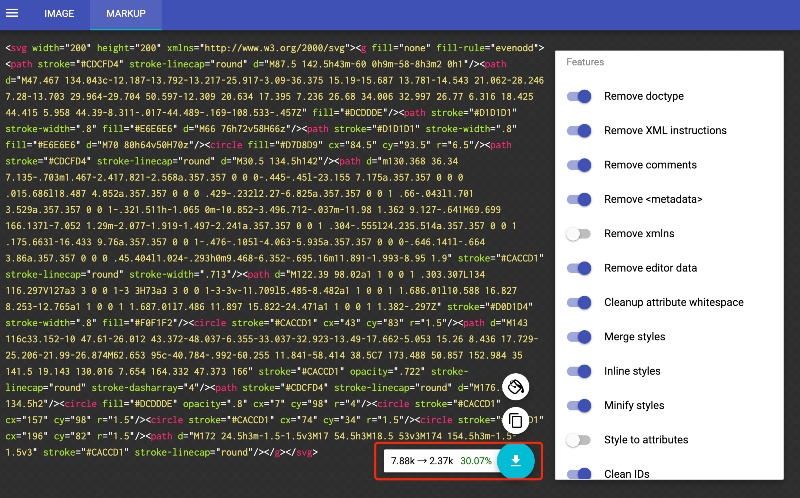
2.2.5 SVG 压缩
很多矢量编辑器在导出 SVG 文件的时候,会附带很多冗余信息。
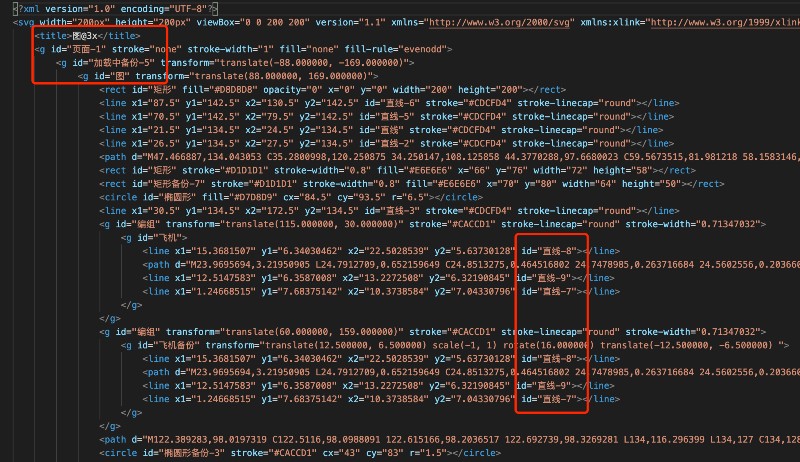
经过 SVGO 类工具压缩之后,体积往往会缩减约 30%。
在项目中可以使用 Webpack svgo-loader 自动压缩。
module.exports = {
  ...,
  module: {
    rules: [
      {
        test: /\.svg$/,
        use: [
          {
            loader: 'file-loader'
          },
          {
            loader: 'svgo-loader',
          }
        ]
      }
    ]
  }}
2.3 延迟埋点上报
大量业务上的埋点上报会阻塞图片加载,保证首屏渲染完成后再执行上报。
2.4 preconnect 预连接域名
页面中使用到的各种资源的域名较多,使用 preconnect 可以提前解析 DNS、TLS 协议、TCP 握手,节约后面加载资源时的网络请求时间。
<link href="https://cdn.domain.com" rel="preconnect">2.5 禁掉 favicon.ico(Webview 场景)
浏览器加载页面时,若没有指定 icon,会默认请求一个根目录下的 favicon.ico 文件,作为手机内嵌的 H5 页面,往往不需要展示图标,为了节约这个请求可以通过在 <head> 里面加上 <link rel="icon" href="data:;base64,="> 禁掉 favicon.ico 网络请求,毕竟弱网条件下,一个网络请求相当于 500ms。
2.6 启动 Gzip/Brotli 压缩
2.6.1 Gzip
Gzip 是一种用于文件压缩与解压缩的文件格式。原本是 UNIX 系统的文件压缩,后来逐渐成为 Web 最流行的数据压缩格式。它基于 Deflate 算法,可将文件无损压缩地更小,对于纯文本文件,大概可以缩减 60% 的体积,从而实现更快的网络传输,特别是对移动端非常重要。当前主流浏览器普遍地支持 Gzip,这意味着服务器可以在发送文件之前自动使用 Gzip 压缩文件,而浏览器可以在接收文件时自行解压缩文件。
2.6.2 Brotli
Google 认为互联网用户的时间是宝贵的,他们的时间不应该消耗在漫长的网页加载中,因此在 2015 年 9 月 Google 推出了无损压缩算法 Brotli,特别侧重于 HTTP 压缩。Brotli 通过变种的 LZ77 算法、Huffman 编码以及二阶文本建模等方式进行数据压缩,与其他压缩算法相比,它有着更高的压缩效率。针对常见的 Web 资源内容,Brotli 的性能相比 Gzip 提高了 17-25%。
除了 IE、Opera Mini 和百度浏览器,所有的主流浏览器都已经支持 Brotli。

三、优化体验
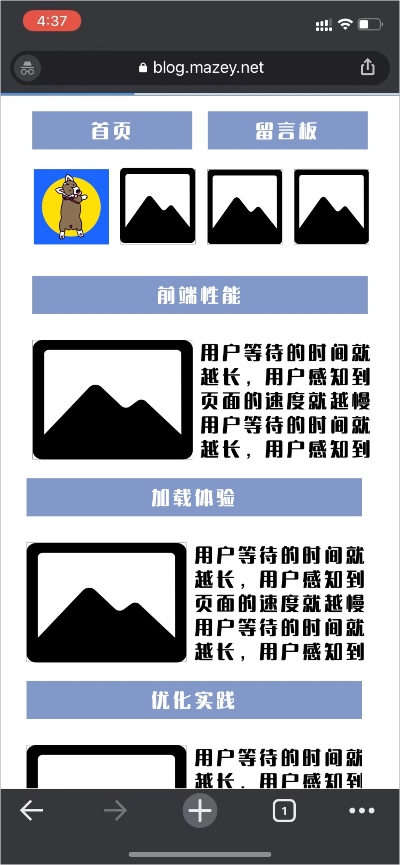
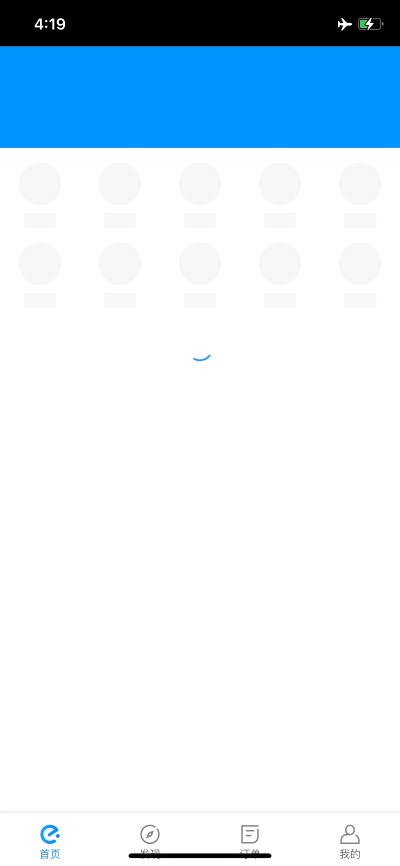
3.1 骨架图
页面加载中添加骨架图,骨架图根据页面基本架构生成,相对于纯白屏,体验更好。

示例:
<body>
    <!--骨架图-->
    <svg></svg>
    <!--内容-->
    <div id="container"></div>
</body>
3.2 图片占位图/懒加载
图片加载的时候设置占位图,提醒用户这边会加载图片,不至于很突兀。
配合 v-lazy 实现示例:
img[lazy=loading] {
    background-size: contain;
    background-image: url(...) ;
}
懒加载示例:
const imageSrc = '...';
const imgLoad = new Image();
imgLoad.onload = () => {
    // 模拟设置图片 src
    setImageSrc(imageSrc);
};
imgLoad.src = imageSrc;
3.3 页面防抖
首屏占位小图标直接转 Base64,必要模块设置高度,规避整个页面的抖动。
附录 A PWA
桌面端 PWA 应用:

移动端添加到桌面:

A.1 什么是 PWA
PWA(Progressive Web App - 渐进式网页应用)是一种理念,由 Google Chrome 在 2015 年提出。PWA 它不是特指某一项技术,而是应用多项技术来改善用户体验的 Web App,其核心技术包括 Web App Manifest、Service Worker、Web Push 等,用户体验才是 PWA 的核心。
PWA 主要特点如下:
- 可靠 - 即使在网络不稳定甚至断网的环境下,也能瞬间加载并展现。
- 用户体验 - 快速响应,具有平滑的过渡动画及用户操作的反馈。
- 用户黏性 - 和 Native App 一样,可以被添加到桌面,能接受离线通知,具有沉浸式的用户体验。
PWA 本身强调渐进式(Progressive),可以从两个角度来理解渐进式,首先,PWA 还在不断进化,Service Worker、Web App Manifest、Device API 等标准每年都会有不小的进步;其次,标准的设计向下兼容,并且侵入性小,开发者使用新特性代价很小,只需要在原有站点上新增,让站点的用户体验渐进式的增强。相关技术基准线:What makes a good Progressive Web App?。
- 站点需要使用 HTTPS。
- 页面需要响应式,能够在平板和移动设备上都具有良好的浏览体验。
- 所有的 URL 在断网的情况下有内容展现,不会展现浏览器默认页面。
- 需要支持 Wep App Manifest,能被添加到桌面。
- 即使在 3G 网络下,页面加载要快,可交互时间要短。
- 在主流浏览器下都能正常展现。
- 动画要流畅,有用户操作反馈。
- 每个页面都有独立的 URL。
A.2 案例调研
A.2.1 米哈游 - 崩坏3
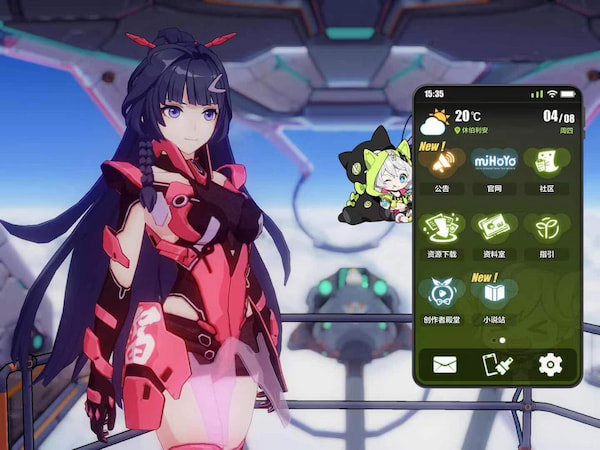
访问地址:https://bbs.mihoyo.com/bh3/
PWA:仅支持在 IOS 端添加到桌面。
A.2.2 阿里速卖通(AliExpress)

访问地址:https://m.aliexpress.com/
PWA:使用 Google Workbox(CDN)
- 支持添加到桌面,manifest。
- 支持缓存,Service Worker。
A.2.3 饿了么

访问地址:https://h5.ele.me/msite/#pwa=true
PWA:自研 - PWA 在饿了么的实践经验
- 支持添加到桌面,manifest。
- 支持缓存和离线访问,Service Worker。
A.2.4 Instagram
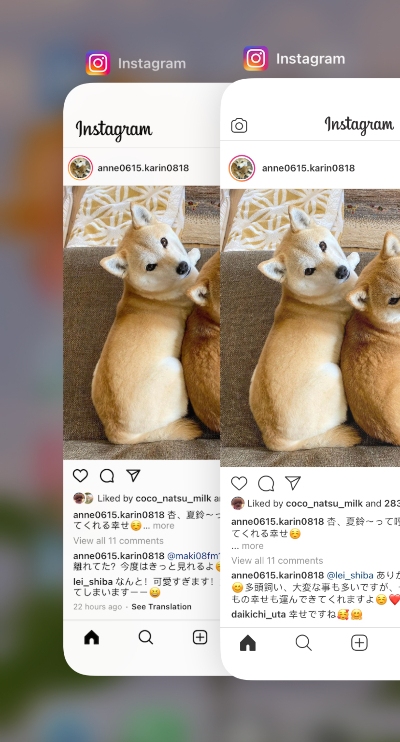
左边原生应用,右边 PWA
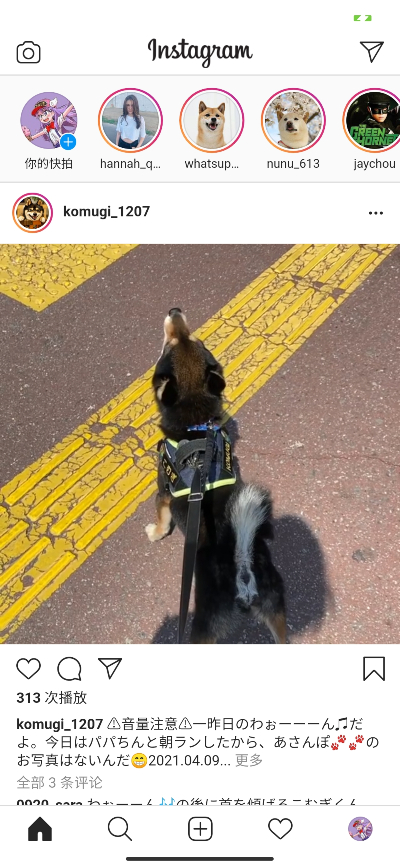
访问地址:https://www.instagram.com/
PWA:使用 Google Workbox
- 支持添加到桌面,manifest。
- 支持缓存,Service Worker。
A.2.5 Twitter
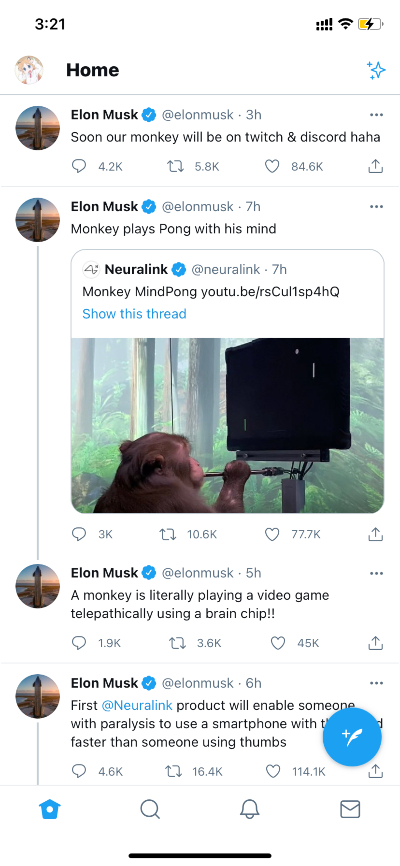
访问地址:https://mobile.twitter.com/home
PWA:Twitter 自研 - How we built Twitter Lite
- 支持添加到桌面,manifest。
- 支持缓存和离线访问,Service Worker。
除了正常的静态资源以外,Twitter 把首页也缓存了下来。
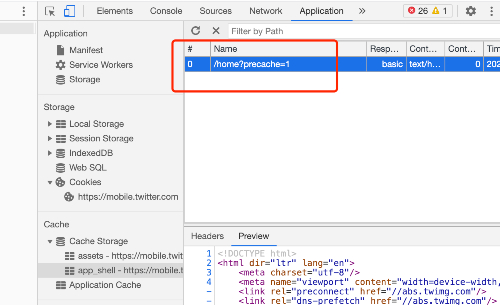
离线状态下有很好的用户体验,而不是显示默认的浏览器页面。

A.3 技术选型(Service Worker)
A.3.1 使用 Google Workbox 构建 Service Worker
A.3.1.1 什么是 Workbox
Workbox 是一组库,可以帮助开发者编写 Service Worker,通过 CacheStorage API 缓存资源。当一起使用 Service Worker 和 CacheStorage API 时,可以控制网站上使用的资源(HTML、CSS、JS、图像等)如何从网络或缓存中请求,甚至允许在离线时返回缓存的内容。
A.3.1.2 如何使用 Workbox
Workbox 是由许多 npm 模块组成的。首先要从 npm 中安装它,然后导入项目 Service Worker 所需的模块。Workbox 的主要特性之一是它的路由和缓存策略模块。
路由和缓存策略
Workbox 允许使用不同的缓存策略来管理 HTTP 请求的缓存。首先确定正在处理的请求是否符合条件,如果符合,则对其应用缓存策略。匹配是通过返回真值的回调函数进行的。缓存策略可以是 Workbox 的一种预定义策略,也可以创建自己的策略。如下是一个使用路由和缓存的基本 Service Worker。
import { registerRoute } from 'workbox-routing';
import {
  NetworkFirst,
  StaleWhileRevalidate,
  CacheFirst,
} from 'workbox-strategies';

// Used for filtering matches based on status code, header, or both
import { CacheableResponsePlugin } from 'workbox-cacheable-response';
// Used to limit entries in cache, remove entries after a certain period of time
import { ExpirationPlugin } from 'workbox-expiration';

// Cache page navigations (html) with a Network First strategy
registerRoute(
  // Check to see if the request is a navigation to a new page
  ({ request }) => request.mode === 'navigate',
  // Use a Network First caching strategy
  new NetworkFirst({
    // Put all cached files in a cache named 'pages'
    cacheName: 'pages',
    plugins: [
      // Ensure that only requests that result in a 200 status are cached
      new CacheableResponsePlugin({
        statuses: [200],
      }),
    ],
  }),
);

// Cache CSS, JS, and Web Worker requests with a Stale While Revalidate strategy
registerRoute(
  // Check to see if the request's destination is style for stylesheets, script for JavaScript, or worker for web worker
  ({ request }) =>
    request.destination === 'style' ||
    request.destination === 'script' ||
    request.destination === 'worker',
  // Use a Stale While Revalidate caching strategy
  new StaleWhileRevalidate({
    // Put all cached files in a cache named 'assets'
    cacheName: 'assets',
    plugins: [
      // Ensure that only requests that result in a 200 status are cached
      new CacheableResponsePlugin({
        statuses: [200],
      }),
    ],
  }),
);

// Cache images with a Cache First strategy
registerRoute(
  // Check to see if the request's destination is style for an image
  ({ request }) => request.destination === 'image',
  // Use a Cache First caching strategy
  new CacheFirst({
    // Put all cached files in a cache named 'images'
    cacheName: 'images',
    plugins: [
      // Ensure that only requests that result in a 200 status are cached
      new CacheableResponsePlugin({
        statuses: [200],
      }),
      // Don't cache more than 50 items, and expire them after 30 days
      new ExpirationPlugin({
        maxEntries: 50,
        maxAgeSeconds: 60 * 60 * 24 * 30, // 30 Days
      }),
    ],
  }),
);
这个 Service Worker 使用一个网络优先的策略来缓存导航请求(用于新的 HTML 页面),当它状态码为 200 时,该策略将缓存的页面存储在一个名为 pages 的缓存中。使用 Stale While Revalidate strategy 缓存 CSS、JavaScript 和 Web Worker,将缓存的资源存储在一个名为 assets 的缓存中。采用缓存优先的策略来缓存图像,将缓存的图像存储在名为 images 的缓存中,30 天过期,并且一次只允许 50 个。
预缓存
除了在发出请求时进行缓存(运行时缓存)之外,Workbox 还支持预缓存,即在安装 Service Worker 时缓存资源。有许多资源是非常适合预缓存的:Web 应用程序的起始 URL、离线回退页面以及关键的 JavaScript 和 CSS 文件。
使用一个支持预缓存清单注入的插件(webpack 或 rollup)来在新的 Service Worker 中使用预缓存。
import { precacheAndRoute } from 'workbox-precaching';

// Use with precache injection
precacheAndRoute(self.__WB_MANIFEST);
这个 Service Worker 将在安装时预缓存文件,替换 self.__WB_MANIFEST,其中包含在构建时注入到 Service Worker 中的资源。
离线回退
让 Web 应用在离线工作时感觉更健壮的常见模式是提供一个后退页面,而不是显示浏览器的默认错误页面。通过 Workbox 路由和预缓存,你可以在几行代码中设置这个模式。
import { precacheAndRoute, matchPrecache } from 'workbox-precaching';
import { setCatchHandler } from 'workbox-routing';

// Ensure your build step is configured to include /offline.html as part of your precache manifest.
precacheAndRoute(self.__WB_MANIFEST);

// Catch routing errors, like if the user is offline
setCatchHandler(async ({ event }) => {
  // Return the precached offline page if a document is being requested
  if (event.request.destination === 'document') {
    return matchPrecache('/offline.html');
  }

  return Response.error();
});
如果用户处于离线状态,则返回缓存的离线页面的内容,而不是生成一个浏览器错误。
有了 Workbox,可以利用 Service Worker 的力量来提高性能,并给您的站点提供独立于网络的优秀的用户体验。
A.3.2 自研 Service Worker
自研 Service Worker 更加灵活、可控,但是因为需要考虑到各种兼容,研发成本较高。
A.4 技术实践(Service Worker)
A.4.1 使用 CLI
安装 Workbox:
npm install workbox-cli -D

npx workbox --help
按照引导配置 workbox-config.js:
npx workbox wizard根据配置生成 Service Worker 程序:
npx workbox generateSW workbox-config.js由于实际静态资源是挂载在 CDN 上面,需要修改预渲染资源的前缀。
![]()
Workbox CLI - generateSW - Configuration
// A transformation that prepended the origin of a CDN for any URL starting with '/assets/' could be implemented as:

const cdnTransform = async (manifestEntries) => {
  const manifest = manifestEntries.map(entry => {
    const cdnOrigin = 'https://example.com';
    if (entry.url.startsWith('/assets/')) {
      entry.url = cdnOrigin + entry.url;
    }
    return entry;
  });
  return {manifest, warnings: []};
};更多缓存配置可查阅官方文档。
A.4.2 使用 Webpack
安装:
npm install workbox-webpack-plugin --save-devWebpack 配置:
// Inside of webpack.config.js:
const WorkboxPlugin = require('workbox-webpack-plugin');
// Version info...
const id = `${page}-v${version}`;

module.exports = {
  // Other webpack config...

  plugins: [
    // Other plugins...

    // WIKI https://developers.google.com/web/tools/workbox/reference-docs/latest/module-workbox-webpack-plugin.GenerateSW#GenerateSW
    new WorkboxPlugin.GenerateSW({
        cacheId: `${id}-gsw`,
        // Do not precache images
        exclude: [/\.(?:png|jpg|jpeg|svg)$/, 'service-wroker.js'], // Page need refresh twice.
        // target dir
        swDest: `../dist/${page}/service-worker.js`,
        skipWaiting: true,
        clientsClaim: true,
        // Define runtime caching rules.
        // WIKI https://developers.google.com/web/tools/workbox/reference-docs/latest/module-workbox-build#.RuntimeCachingEntry
        // Example https://gist.github.com/jeffposnick/fc761c06856fa10dbf93e62ce7c4bd57
        runtimeCaching: [
          // icon images
          {
            // Match any request that ends with .png, .jpg, .jpeg or .svg.
            urlPattern: /^https:\/\/cdn.example.com\/platform/, // /\.(?:png|jpg|jpeg|svg)$/,
            // Apply a cache-first strategy.
            handler: 'CacheFirst',
            options: {
              // Use a custom cache name.
              cacheName: `${id}-icon-images`,
              // Only cache 50 images, and expire them after 30 days
              expiration: {
                maxEntries: 50
              },
              // Ensure that only requests that result in a 200 status are cached
              cacheableResponse: {
                statuses: [0, 200]
              }
            }
          },
          // note images & others
          {
            // Match any request that ends with .png, .jpg, .jpeg or .svg.
            urlPattern: /^https:\/\/image.example.com/, // /\.(?:png|jpg|jpeg|svg)$/,
            // Apply a cache-first strategy.
            handler: 'CacheFirst',
            options: {
              // Use a custom cache name.
              cacheName: `${id}-note-images`,
              // Only cache 50 images, and expire them after 30 days
              expiration: {
                maxEntries: 50,
                maxAgeSeconds: 60 * 60 * 24 * 30 // 30 Days
              },
              // Ensure that only requests that result in a 200 status are cached
              cacheableResponse: {
                statuses: [0, 200]
              }
            }
          }
        ]
      });
  ]
};
页面中触发 Service Work:
<script>
// Check that service workers are supported
if ('serviceWorker' in navigator) {
  // Use the window load event to keep the page load performant
  window.addEventListener('load', () => {
    navigator.serviceWorker.register('/service-worker.js');
  });
}
</script>
A.5 添加到桌面方案
A.5.1 manifest.json 配置
{
"name": "不知不问",
"short_name": "不知不问",
"description": "yyds",
"start_url": "/?entry_mode=standalone",
"display": "standalone",
"orientation": "portrait",
"background_color": "#F3F3F3",
"theme_color": "#F3F3F3",
"icons": [
{
"src": "//blog.mazey.net/mazey-cn/fav/logo-dark-circle-32x32.png",
"sizes": "32x32",
"type": "image/png"
},
{
"src": "//blog.mazey.net/mazey-cn/fav/logo-dark-circle-144x144.png",
"sizes": "144x144",
"type": "image/png"
},
{
"src": "//blog.mazey.net/mazey-cn/fav/logo-dark-circle-152x152.png",
"sizes": "152x152",
"type": "image/png"
},
{
"src": "//blog.mazey.net/mazey-cn/fav/logo-dark-circle-180x180.png",
"sizes": "180x180",
"type": "image/png"
},
{
"src": "//blog.mazey.net/mazey-cn/fav/logo-dark-circle-192x192.png",
"sizes": "192x192",
"type": "image/png"
},
{
"src": "//blog.mazey.net/mazey-cn/fav/logo-dark-circle-512x512.png",
"sizes": "512x512",
"type": "image/png"
}
],
"scope": "/"
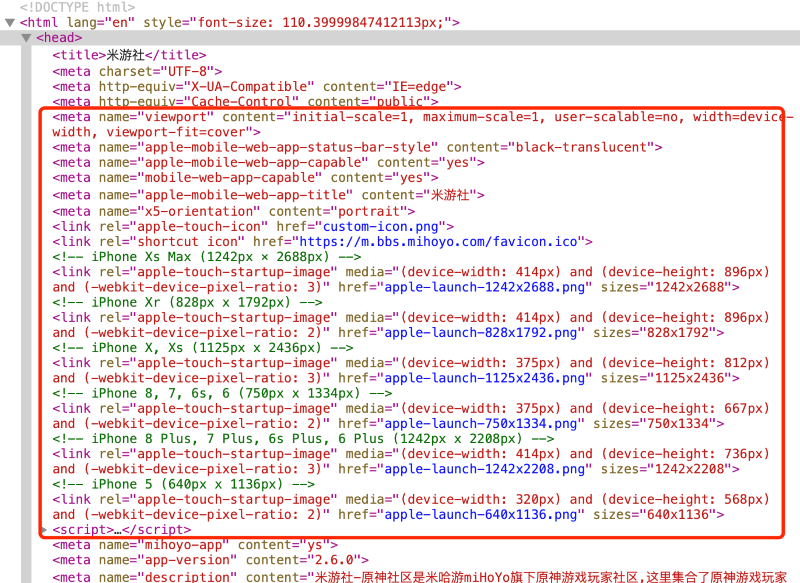
}A.5.2 <head> 配置
为网站配置开屏图片、状态栏等。
<!--Mazey's favicon begin-->
<link rel="shortcut icon" type="image/png" href="//blog.mazey.net/mazey-cn/fav/logo-dark-circle-transparent-144x144.png">
<link rel="icon" type="image/png" sizes="32x32" href="//blog.mazey.net/mazey-cn/fav/logo-dark-circle-transparent-32x32.png">
<link rel="apple-touch-icon" sizes="144x144" href="//blog.mazey.net/mazey-cn/fav/logo-dark-circle-144x144.png">
<link rel="apple-touch-icon" sizes="152x152" href="//blog.mazey.net/mazey-cn/fav/logo-dark-circle-152x152.png">
<link rel="apple-touch-icon" sizes="180x180" href="//blog.mazey.net/mazey-cn/fav/logo-dark-circle-180x180.png">
<link rel="apple-touch-icon" sizes="192x192" href="//blog.mazey.net/mazey-cn/fav/logo-dark-circle-192x192.png">
<link rel="apple-touch-icon" sizes="512x512" href="//blog.mazey.net/mazey-cn/fav/logo-dark-circle-512x512.png">
<!--Mazey's favicon end-->
<!--Mazey's pwa manifest.json-->
<link rel="manifest" href="/wp-content/themes/polestar/manifest.json">
<!-- 开机图片 - begin -->
<!-- iPhone Xs Max (1242px × 2688px) -->
<link rel="apple-touch-startup-image" media="(device-width: 414px) and (device-height: 896px) and (-webkit-device-pixel-ratio: 3)" href="//blog.mazey.net/i-mazey-net/asset/read/cat-lovers-1242x2688.jpg" sizes="1242x2688">
<!-- iPhone Xr (828px x 1792px) -->
<link rel="apple-touch-startup-image" media="(device-width: 414px) and (device-height: 896px) and (-webkit-device-pixel-ratio: 2)" href="//blog.mazey.net/i-mazey-net/asset/read/cat-lovers-828x1792.jpg" sizes="828x1792">
<!-- iPhone X, Xs (1125px x 2436px) -->
<link rel="apple-touch-startup-image" media="(device-width: 375px) and (device-height: 812px) and (-webkit-device-pixel-ratio: 3)" href="//blog.mazey.net/i-mazey-net/asset/read/cat-lovers-1125x2436.jpg" sizes="1125x2436">
<!-- iPhone 8, 7, 6s, 6 (750px x 1334px) -->
<link rel="apple-touch-startup-image" media="(device-width: 375px) and (device-height: 667px) and (-webkit-device-pixel-ratio: 2)" href="//blog.mazey.net/i-mazey-net/asset/read/cat-lovers-750x1334.jpg" sizes="750x1334">
<!-- iPhone 8 Plus, 7 Plus, 6s Plus, 6 Plus (1242px x 2208px) -->
<link rel="apple-touch-startup-image" media="(device-width: 414px) and (device-height: 736px) and (-webkit-device-pixel-ratio: 3)" href="//blog.mazey.net/i-mazey-net/asset/read/cat-lovers-1242x2208.jpg" sizes="1242x2208">
<!-- iPhone 5 (640px x 1136px) -->
<link rel="apple-touch-startup-image" media="(device-width: 320px) and (device-height: 568px) and (-webkit-device-pixel-ratio: 2)" href="//blog.mazey.net/i-mazey-net/asset/read/cat-lovers-640x1136.jpg" sizes="640x1136">
<!-- 开机图片 - end -->
<!-- Touch Bar区域显示的网站图标 -->
<link rel="mask-icon" href="//blog.mazey.net/mazey-cn/fav/logo-dark-circle.svg" color="#F3F3F3">
<!-- 主题色 = manifest.json theme_color -->
<meta name="theme-color" content="#F3F3F3">
<meta name="apple-mobile-web-app-capable" content="yes">
<!-- 状态栏颜色 default/black/black-translucent -->
<meta name="apple-mobile-web-app-status-bar-style" content="black-translucent">
<!-- 应用名 -->
<meta name="apple-mobile-web-app-title" content="不知不问">
<!-- 在Windows 8上,我们可以将网站固定在开始屏幕上,而且支持个性化自定义色块icon和背景图片。这个标签是用来定义色块的背景图的。色块图应该为144*144像素的png格式图片,背景透明。 -->
<meta name="msapplication-TileImage" content="//blog.mazey.net/mazey-cn/fav/logo-dark-circle-transparent-144x144.png">
<!-- 同前一个元数据msapplication-TileImage类似,这个功能是用来设置颜色值,个性化自定义色块(磁贴)icon -->
<meta name="msapplication-TileColor" content="#F3F3F3">
开屏图片尺寸总结:
| 屏幕尺寸 | 倍数 | 图片尺寸 |
|---|---|---|
| 1024x1366(512x683) | x2 | 2048x2732 |
| 834x1194(417x597) | x2 | 1668x2388 |
| 768x1024(384x512) | x2 | 1536x2048 |
| 834x1112(417x556) | x2 | 1668x2224 |
| 810x1080 | x2 | 1620x2160 |
| 428x926(214x463) | x3 | 1284x2778 |
| 390x844 | x3 | 1170x2532 |
| 375x812 | x3 | 1125x2436 |
| 414x896 | x3 | 1242x2688 |
| 414x896 | x2 | 828x1792 |
| 414x736 | x3 | 1242x2208 |
| 375x667 | x2 | 750x1334 |
| 320x568 | x2 | 640x1136 |
附录 B 客户端缓存支持
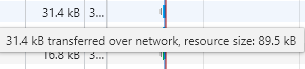
客户端在页面首次加载后把资源缓存下来,之后每次加载不进行网络请求直接读取缓存,然后再对比本次请求的版本和线上的版本,若有更新再次缓存以供下次访问,极大的缩短白屏时间。缺点是有滞后性,永远落后于线上一个版本。
附录 C 客户端离线包支持
为了解决客户端缓存的滞后问题,离线包方式是一种提前下载页面资源的方式。缺点是占用用户更多的流量,优点是能够实现真正意义上的页面"秒开"。

附录 D 优化后端接口数据
首屏动态渲染受制于后端接口返回的数据,如果接口存在体积大、有前后依赖关系、数量多需要耦合等问题,首屏渲染因为等待数据往往会比较慢。解决办法是拉上后端一起梳理下哪些数据才是首屏所需要的,用一个接口把首屏数据输送给前端。
附录 E 优化占用内存
在浏览器控制台的 Performance 栏位,可以记录整个页面生命周期的每一个细节,其中有大量描述 JavaScript 堆栈内存占用的情况。
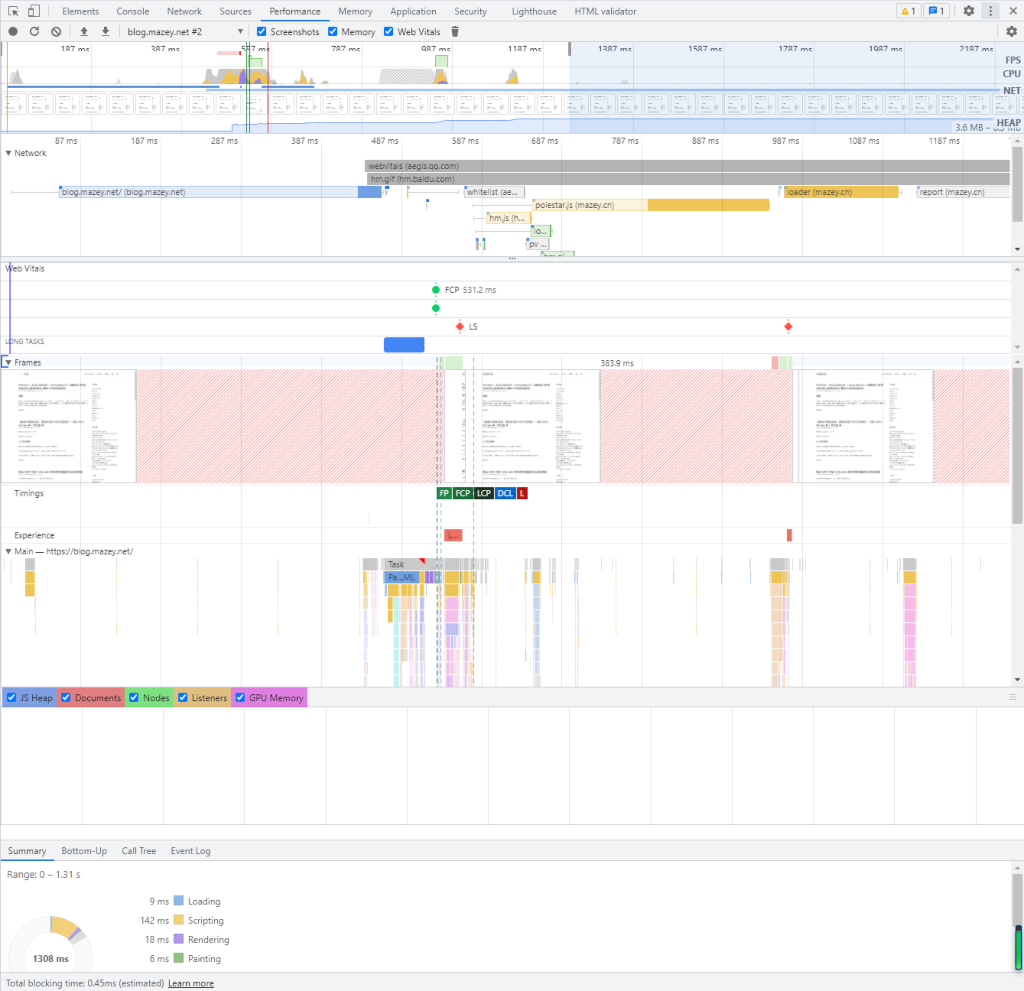
E.1 CPU 内存
CPU memory is attached to the CPU, and is almost universally two DIMMs wide (128b), and is a multi-drop bus (so requires more power and conditioning to drive, even at lower clocks.) Of course, we generally expect to be able to configure CPU memory by snapping in different DIMMs, so the CPU’s memory controller is far more complicated and flexible.
JavaScript 对内存的占用受代码的影响,如果在运行时缓存和计算大量的数据、处理巨量字符串等耗费空间的行为,那么内存就会极速飙升,极端情况下会导致承载网页的应用闪退。
E.2 GPU 显存
GPU memory is attached to the GPU, and is a wider interface, with shorter paths and a point-to-point connection. As a consequence, it generally runs at higher speed (clock) than CPU memory.
It’s common for GPU memory to deliver several hundred GB/s to the GPU; for a CPU, it’s in the mid tens of GB/s. (There are higher-end CPUs with very wide interfaces that are around 100 GB/s.)
The internal design of both kinds of memory is very similar.
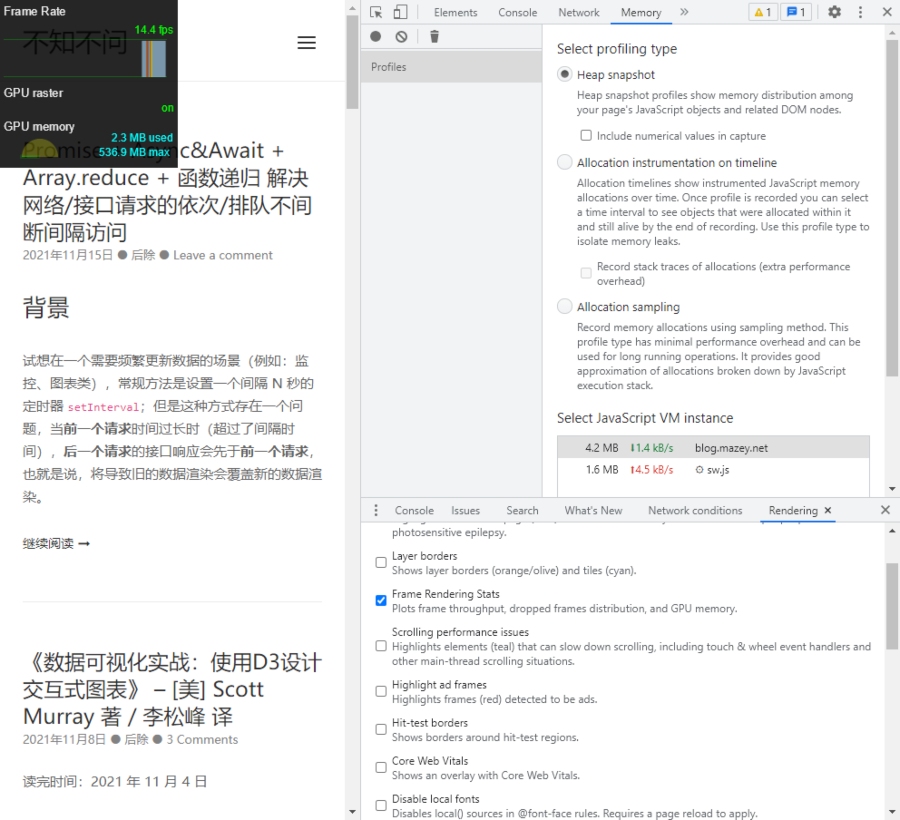
经由我自测,这部分内存受屏幕尺寸和帧数影响较大,如果是动画或高精度的图片渲染时,则内存会向上浮动。
附录 F 预渲染
动态渲染的页面,首屏需要等待 JavaScript 加载完成之后才能执行渲染,等待 JavaScript 加载的时间越久,白屏的时间越久。而通过在 CI/CD 阶段,将传统 SSR 的流程执行一遍,用动态生成的 index.html 覆盖原来"空的"index.html,即优化了首屏加载体验,省去了骨架屏的步骤,也提升了加载速度。使用 prerender-spa-plugin 可以轻松配置预渲染页面,现已经被 React/Vue 项目广泛应用。
附录 G peerDependencies
G.1 什么是 peerDependencies
peerDependencies 存在于 npm 的 package.json 中,如果项目中依赖模块 X、模块 Y,模块 Y 又依赖模块 X,当模块 X 出现版本冲突的时候,则会打包出 X 的两份代码。在这个模块 Y 里面使用 peerDependencies 引入模块 X,这样当前项目和模块 Y 便会共用这个模块 X。
当在 peerDependencies 引入一个模块后:
- 当前的代码将与符合版本条件的模块和谐相处。
- 如何这个模块已经存在于项目的
node_modules中,什么也不提示。 - 如何这个模块不存在于项目的
node_modules中,警告用户缺少此模块,但是不自动安装。
注意: npm i 并不会自动安装 peerDependencies 里的模块,所以开发模块的需要在 devDependencies 同步添加相应模块。
G.2 什么场景下适合引入 peerDependencies
- 多份模块代码的重复加载易引发冲突。
- 依赖在项目中是可见的。
- 可以让开发者自己决定安装哪个版本。
业内应用:
"peerDependencies": {
    "react": ">=16.9.0",
    "react-dom": ">=16.9.0"
}"peerDependencies": {
"vue": "^2.5.17"
}G.3 案例
测试项目 test-project 为例,dependencies 为:
# test-project
"dependencies": {
    "m1": "1.0.0",
    "m2": "1.0.0",
    "m-child": "1.0.0"
}

# m1@1.0.0
"dependencies": {
    "m-child": "2.0.0",
}

# m2@1.0.0
"dependencies": {
    "m-child": "3.0.0",
}
npm i 之后,实际的 node_modules 结构是这样的:
node_modules
├── m1 1.0.0
│   └── node_modules
│       └── m-child 2.0.0
├── m2 1.0.0
│   └── node_modules
│       └── m-child 3.0.0
└── m-child 1.0.0
如上所见 m-child 的三个版本都下载到了本地,并且构建打包后包含了三份 m-child 的代码。
为了解决这部分重复代码,在模块 m1 和 m2 中引入 peerDependencies:
# m1@1.0.0
"peerDependencies": {
    "m-child": ">=1.0.0"
}

# m2@1.0.0
"peerDependencies": {
    "m-child": ">=1.0.0"
}
npm i 之后,实际的 node_modules 结构:
node_modules
├── m1 1.0.0
├── m2 1.0.0
└── m-child 1.0.0
test-project、m1、m3 三个部分将和谐共用 m-child@1.0.0,构建打包后也只有一份 m-child。
参考
- Resource Hints – What is Preload, Prefetch, and Preconnect?
- 渐进式 Web 应用(PWA) | MDN
- What is the difference between GPU memory and CPU memory?
- 使用内存性能分析器查看应用的内存使用情况
编辑记录
| 时间线 | 编辑内容 |
|---|---|
| 2019-08-16 | 记一次前端加载体验优化 |
| 2022-01-26 | 前端性能和加载体验优化实践 |
版权声明
本文为原创文章,作者保留版权。转载请保留本文完整内容,并以超链接形式注明作者及原文出处。
作者: 除除
原文: http://blog.mazey.net/2548.html
(完)


2022年5月22日
Vue will automatically use the container's innerHTML as the template if the root component does not already have a template option.